Do you need help setting up a Dlink 1860 extender? You may find setup instructions for the D-Link DAP-1860 on this blog. Consider installing a d-link DAP-1860 extender to enhance the range of your Wi-Fi signals. Since a router can’t reach every corner of the room, you may install a D-Link Dap 1860 extender to broaden the wireless coverage. For the most demanding tasks, such as 4K streaming, gaming, and browsing, it provides the best performance. Setting up a D’link extension is a quick and easy operation. To start, use the dlinkap.local web address to access the D’link Dap 1860 login page and expand your home network. For d-link extender setup, follow these procedures.
How do I setup dlink DAP1860 extender?
- Your D-Link DAP-1860 extender must be connected to a power source. Make sure your router is in the same area where you put it.
- Dlink extenders may be connected to computers wirelessly or with an Ethernet connection using an SSID and password.
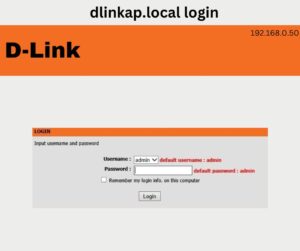
- Next, open a web browser and enter 192.168.0.50 or dlinkap.local into the address bar.
- You will then be sent to the D’link Dap 1860 login page, where you must enter your username and password.
- Next, in the Dlink extender setup process, choose your home network. Input your dlink network’s wifi network key.
- The wifi and security settings of the router will be copied by the setup process. If you’d like, you can modify the SSID and password.
- To make the changes effective, click the “Save” button. When the installation is finished, the extender’s LED will turn green.
D-link 1860 Extender Login Via dlinkap.local
You must complete the fundamental setup steps before you can begin the dlinkap login procedure. To connect the devices, adhere to the procedures below:
- Place the D-Link extender in the proper spot first.
- After that, use an Ethernet wire to connect your computer to the range extender.
- Turn on the D-Link range extender by plugging it into an electrical socket.
- The next step is to join the wireless network using your D-Link device.
- Launch a browser now, and in the address box, type http://dlinkap.local for the default web address.
- Instead of the website address, you may instead log in to your D-Link extender by its IP address. The d-Link wifi repeater’s default IP address is http://192.168.0.50.
- On the login page, enter the default username and password and click “Login.”
Look for the printed label at the bottom of the device if you are unsure about your login details. The device information is written there, as you can see. Because you’ll need it for the d-link wifi extender setup procedure, make a note of everything.
D-link 1860 Extender Firmware Update Via http://dlinkap.local/
- Ensure that the D-Link 1860 extender is connected to a power source.
- Join the Wi-Fi network with the SSID “D-XXX 5GHz” or a similar one using your laptop or PC. This is the network of your extender’s 5GHz antennas. Additionally, a 2.4Ghz network with the same name is provided.
- There is no need for a password because this is the first time connecting to the network, which lacks security.
- Open a browser on the same device and type 192.168.0.50 or http //dlinkap.local into the address bar.
- Once you’ve been led to the page where you need to enter your credentials, type “admin” in both the “Username” and “Password” fields. Login by clicking.
- Both “Manual Update” and “Automatic Updates” are available under the “Management Settings” section of the “Firmware” menu.
- If your internet connection is steady, choose the “Automatic Update” option, which will update suitable software and versions for your extender without your intervention.
- Alternately, download the firmware for your extender, then install it by choosing the ‘Select the file’ option and choosing the downloaded file from your desktop.